Find out how to assemble your Philips Avent Grippy cup. Follow these simple steps.
How to assemble my Philips Avent Grippy cup
Published on 24 June 2026
Play Pause
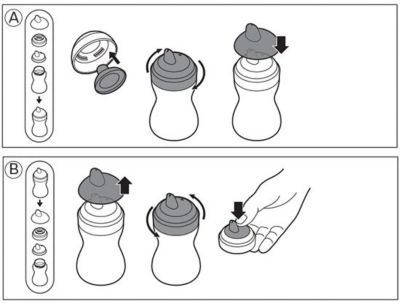
Assemble your Grippy cup with a Silicone spout
To assemble your Philips Avent spout cup with a Silicone spout. Follow these instructions
- Pull the spout through the screw ring until it snaps into place
- Screw the drinking top on the spout cup firmly, but do not overtighten
- Put the cap on the spout for hygienic protection
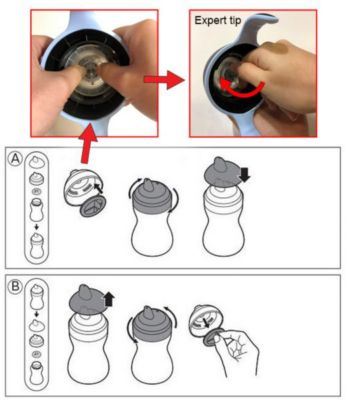
Assemble your Grippy cup with a Soft spout
To assemble your Philips Avent Grippy cup with a Soft spout. Follow these instructions
- Pull the spout through the screw ring until it snaps into place
- Place and secure the valve until you feel it snaps into place (see image below)
- Turn the valve about a quarter of a turn (90 degrees) to ensure a tight fit (see image below)
- Screw the drinking top on the spout cup firmly, but do not overtighten
- Put the cap on the spout for hygienic protection
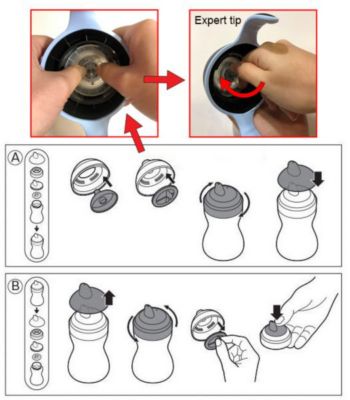
Assemble your Grippy cup with a Hard spout
To assemble your Philips Avent Grippy cup with a Hard spout. Follow these instructions
- Place and secure the valve underneath the screw ring until you feel it snaps into place
- Turn the valve about a quarter of a turn (90 degrees) to ensure a tight fit (see image below)
- Screw the drinking top on the spout cup firmly, but do not overtighten
- Put the cap on the spout for hygienic protection